The most accessible and effective way to protect plants from winter frosts is to create a greenhouse. In this article, we will explain how to build a polycarbonate greenhouse with your own hands.
To build a polycarbonate greenhouse, you will need the following materials:
- Polycarbonate
- Metal pipes or wooden bars
- Electrodes
- Tension rings
- Staples
- Electric knife or scissors
First, choose a sunny and convenient location for your greenhouse.
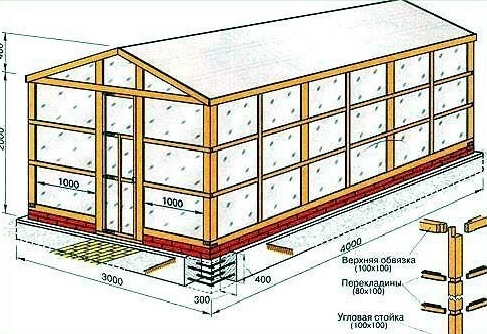
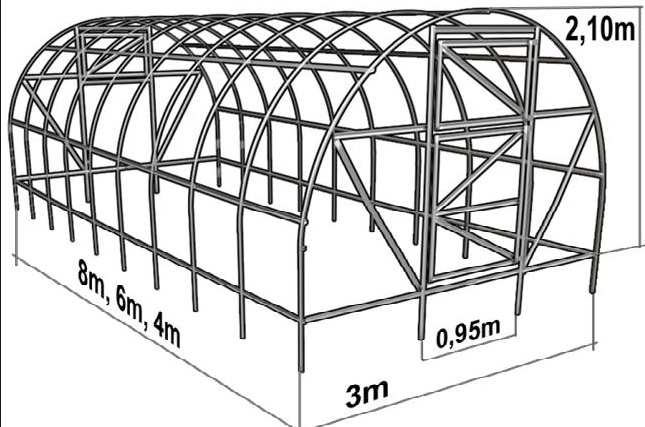
Prepare metal pipes (20x40mm) or wooden bars (40x40mm) to be used as the frame for the greenhouse. Their length should match the length of the greenhouse you want to create.
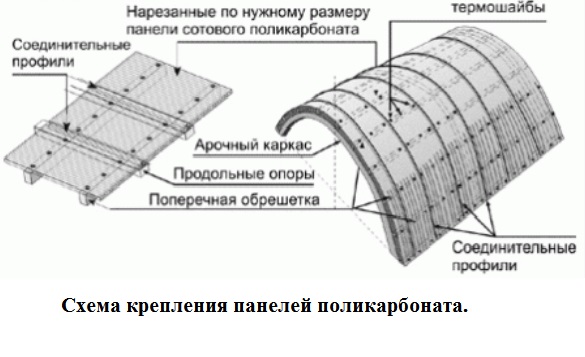
Cut the polycarbonate into pieces of the required sizes. They should be slightly larger than the dimensions of your frame, so you can secure them around the frame.
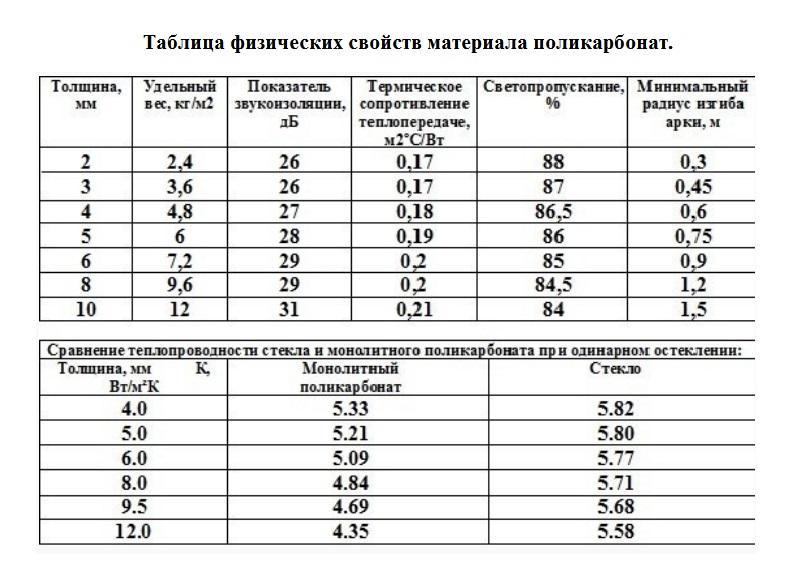
Due to its transparency, special strength, and temperature stability, the use of polymer plastic or polycarbonate extends to many areas.
Note that to better protect plants from the cold, the polycarbonate should be installed with a slight tilt.
Wooden Frame of the Greenhouse
To construct the wooden frame, you will need the following materials and tools:
- Wooden beam, section 5×7 cm.
- Copper sulfate.
- Corner and T-shaped metal fasteners.
- Door hinges.
- Screws.
- Saw or jigsaw.
- Screwdriver.
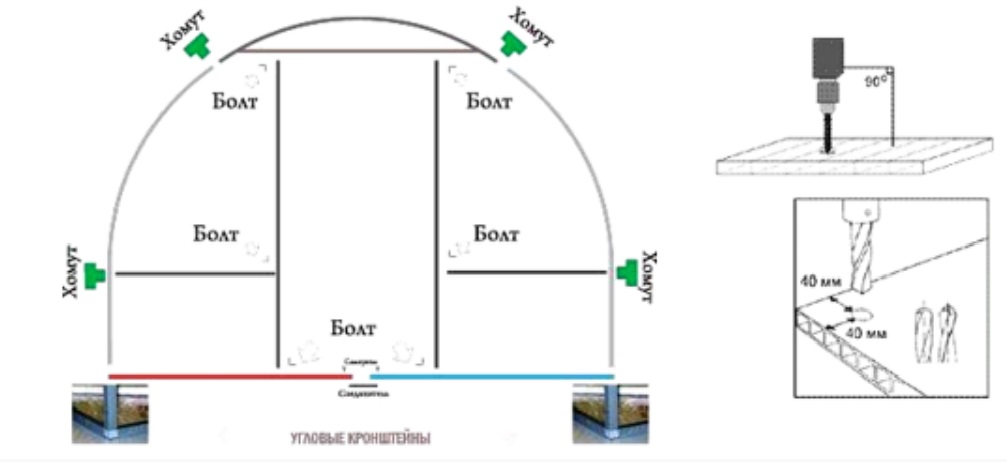
First, treat the wood with copper sulfate to protect it from rot and extend the greenhouse’s life. The greenhouse is easily mounted on a wooden base. First, set up the lower binding. To do this, attach the beam to the wooden foundation with screws. Then, install the side posts.
Measure and cut the required amount of beam, 1.5 meters or longer. The distance between one post and another should not exceed 0.6 meters, as the polycarbonate can be destroyed by wind gusts or snow pressure. Attach all side elements to the lower beam with corner metal fasteners.
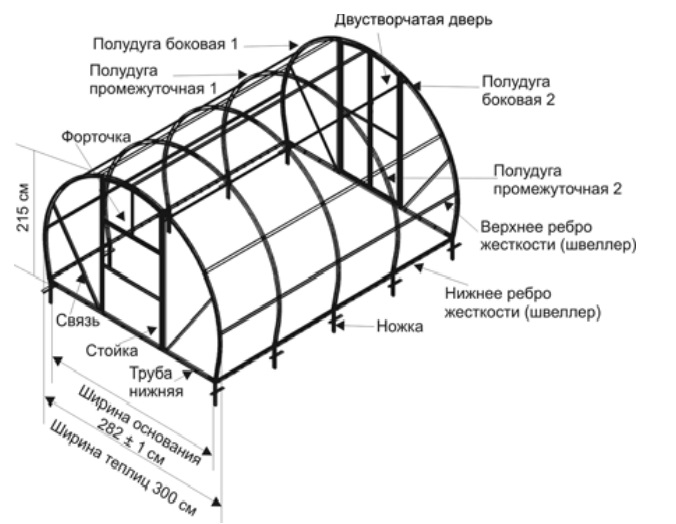
The next important step in setting up the frame is attaching elements such as end posts and braces. This is easily done by yourself. Start by preparing a pair of beams, slightly longer than the side posts (0.5 – 0.6 meters). The end beams are attached with T-shaped fasteners and screws. Now, let’s deal with the braces, which are necessary to stiffen the frame. These elements allow the greenhouse to withstand strong winds. Attach these elements to each corner of the greenhouse, ensuring they are positioned in mirror projection on parallel axes.
The next step is the upper binding, which connects the frame into a single structure. Install this element in the same way as the lower binding. The only difference is that the end post divides the beam in half. Now, install the rafters. To do this, set up the beam on top of both end posts, which will serve as the intermediate support.
Then, lay the rafters over the beam, with the space between the rafters equaling the distance from one side post to another. Polycarbonate is laid over these rafters. Now let’s talk about the doors. They are easily mounted by assembling a frame out of the beam and reinforcing it with stiffness ribs. Install the doors using ordinary hinges.
How to Attach Polycarbonate to the Greenhouse?
Various materials and tools can be used to attach polycarbonate to the greenhouse, including:
- Fastening clips: Simple and inexpensive clips for polycarbonate. They attach the polycarbonate to the greenhouse frame and allow easy modification or removal.
- Tape or double-sided tape: Another method of attaching polycarbonate to the greenhouse frame. Easy to use and provide a fairly sturdy attachment.
- Drip adhesive tapes: These adhesive tapes are used to attach polycarbonate to the frame in areas where other types of fastenings cannot be used.
The choice of how to attach polycarbonate depends on individual needs and preferences.
When building a polycarbonate greenhouse, remember that this material requires protection from ultraviolet rays. Some manufacturers of polycarbonate solve this problem by applying a special varnish to the sheets, while others coat the polycarbonate only on one side. For the first option, the method of laying polycarbonate is not important. However, with one-sided coating, the polycarbonate should be laid with the treated side facing out.
What Length of Polycarbonate Is Needed for the Greenhouse?
The length of polycarbonate needed for the greenhouse depends on the size of your greenhouse. Typically, to cover a greenhouse measuring 4 meters by 4 meters, you will need about 16 meters of polycarbonate. Remember that you will also need additional materials, such as aluminum rails and rivets, to attach the polycarbonate to the frame. Also, consider that when purchasing polycarbonate, the seller may add an extra 10-15% of material to account for leftovers and losses during cutting.