Many of us are familiar with electrolysis from our school days. Back then, we observed the process by placing two electrodes in water under a direct current. Today, let’s revisit our childhood, but on a larger scale, and build an electrolyzer with our own hands.
Materials Required for Building an Electrolyzer
- Stainless steel sheet;
- M6 x 150 bolts, washers, and nuts;
- Clear tubing, such as a water level hose, costing no more than 4.5 USD for 10 meters;
- Several ‘Christmas tree’ barb fittings with an 8 mm outer diameter to fit the tubing;
- A 1.5-liter plastic container (like those used for food packaging);
- A small filter for purifying running water (similar to those used in washing machines);
- A one-way water valve.
Choosing the Right Stainless Steel
The ideal choice is AISI 316L stainless steel, the domestic equivalent of which is 03X16H15M3 stainless steel, used in fabricating welded structures that operate in boiling phosphoric, sulfuric acids.
It’s not necessary to order a new sheet of stainless steel; an old piece from the garage will do. Buying a whole sheet is an unnecessary expense, as it’s sold in 2 square meter pieces, which is more than needed. A 50 x 50 cm piece is sufficient.
Why stainless steel? Because ordinary metal will rust in water. Additionally, we’ll be using not just water, but also an alkaline solution, which is an aggressive environment, particularly for the transmission of electric current through our electrolyte. This environment would quickly corrode ordinary metal plates.
Preparing and Assembling the Plates
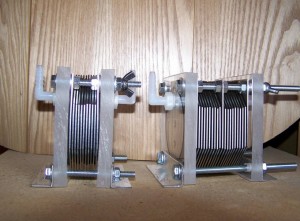
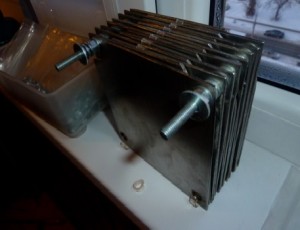
Mark the stainless steel sheet to cut approximately 16 even squares. Use an angle grinder for cutting. In each piece, cut one corner off to facilitate proper plate assembly.
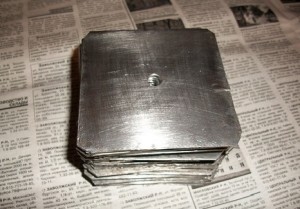
Drill a hole for an M6 bolt in the opposite corner of each cut. In our electrolyzer, the plates are fully immersed in water, ensuring the entire surface of the stainless steel plates is utilized.
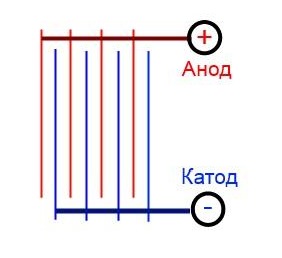
The hydrogen generator, or electrolyzer, operates as follows: when an electric current flows through the electrolyte from plate to plate, water is split into hydrogen and oxygen. Therefore, positive and negative plates are required.
The larger the plates, the greater the current that can pass through the water, and the more gas is generated. Consequently, several plates will serve as positive and negative terminals.
The plates are connected alternately (+-+-+-+- and so on). This arrangement allows for a low supply voltage and sufficient current to power the DIY electrolyzer.
Insulating the Plates and Final Assembly
Use the water level tubing for insulation between adjacent plates. Cut small rings from the tubing, which are then slit to form strips approximately 1 mm thick. This spacing between the plates is found to be most effective for gas generation in the electrolyzer.
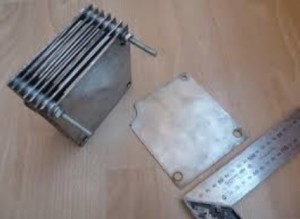
Assemble the plates using washers and bolts in a mirror arrangement: eight plates each for the positive and negative sides. Ensure the assembly is correct to avoid short-circuiting.
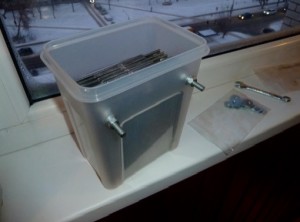
Once assembled, test for short circuits, then place the entire assembly in the plastic box. Drill holes for the bolts in the box, ensuring a tight seal. Also, drill the lid for inserting the barb fittings and seal with silicone sealant for water tightness.
Testing the Electrolyzer
For testing, connect the device to a power source, fill with water up to the bolts, attach the lid, connect a tube to the barb fitting, and submerge the other end of the tube in a water-filled container. With a low current, the tube may not release gas visibly, but gas will be evident inside the electrolyzer!
To increase gas production, increase the current through the electrolyte. Since water is a poor conductor of electricity, add sodium hydroxide (available in household cleaning products like “Krot”) to the water to create a true electrolyte.
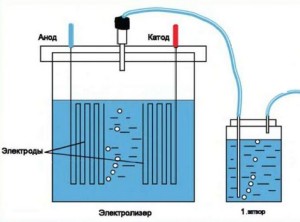
The roles of the safety valve and filter from the washing machine are to prevent excessive gas accumulation, which could lead to dangerous situations.
That’s all you need to know to build your own electrolyzer. Happy experimenting!
DIY Electrolyzer Video Guide
https://youtu.be/Dsp1QGsOD4E